This page is intended as a how-to guide for repairing the door wiring on MKII Toyota MR2s. This page contains:
Failure of the door wiring harness is a common problem in early MKII MR2s. The failure is do to a batch of bad wires used in the harnesses. Moisture can accumulate in the rubber accordion running between the door and kick panel which leads to corrosion and poor connections. Symptoms include intermittent function of the power windows and locks. If the problem goes away when the door is open or when the rubber accordion is moved by hand, it's a very strong indication that the wires in the harness have broken or are close to breaking.
Before taking everything apart, there are a couple of simple checks you can do. Obviously, check all fuses. Also, the BGB specifies a switch panel check procedure you can perform. Follow the directions below for removing the switch panel and perform the check as specified. If the switch panel passes the check and all fuses are in order, it's a good chance the wiring harness has failed and needs to be repaired.
This is a straightforward, but time-consuming job. It requires no special tools but is labor-intensive, so it's a good job for the DIY-er looking to save some money. A new wiring harness runs ~ $150 and will probably cost a few hours of labor to repair at the dealer. If you do it yourself you're only out time and a few cents of consumables (tape, short bits of wire). Your car will be drivable while you do the repair. I would allow a half-day to do it, but it will go much faster if you've removed the door panel before.
Note that this job requires a lot of contorting into the driver's side foot well to get access to various bits. Before you begin, slide the seat all the way back, recline it, and tilt the steering wheel up as well to give yourself maximum room. It's also helpful to get some pads or towels to lay across the door sill so the assorted edges don't dig into your back.
Roll the window up (if you can) before taking everything apart. This way if it start's raining and you don't have a garage, you won't soak your car. It also gives you more room when rooting around inside the door. The downside is that it's somewhat harder to lift the door panel free.
Also note: If at anytime in the near future you're planning on doing an audio install that will involve running new wire for door speakers, now's the time to do it. Consider running two sets of wire, in case you decide on a component set and want the crossovers somewhere other than the doors. I did this repair in the Spring and ran new wire for speakers I didn't add until the following Fall. I just left myself a few feet of slack wire in the door panel, and left myself 15 feet or so on the other end coiled up under my driver's floor mat. You'll have to take the door panel off again to add the speakers, but at least you won't have to deal with the harness again.
Required tools/supplies:
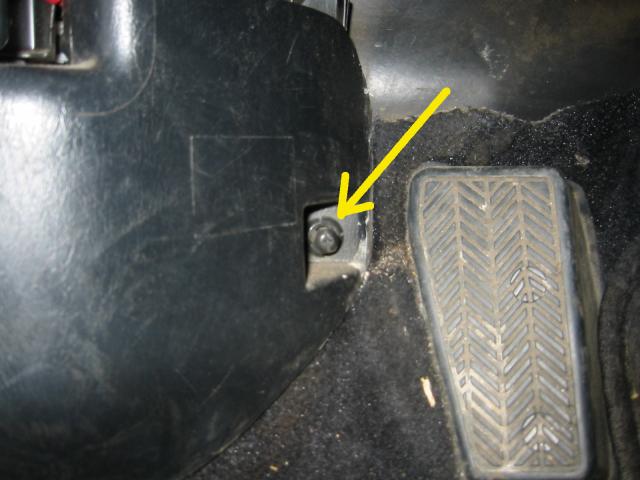
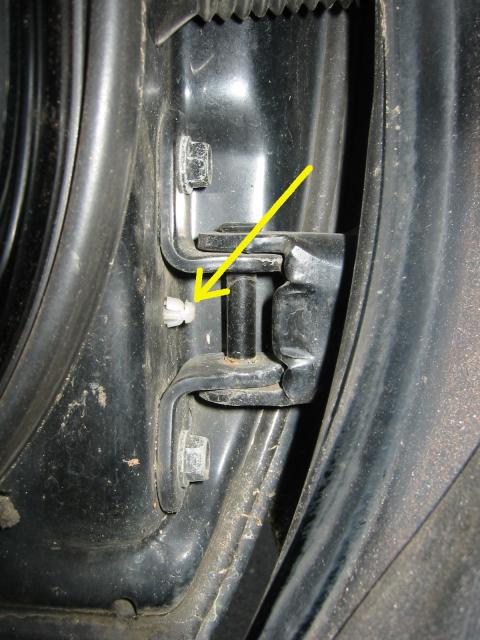
Step 1: We begin by removing the kick panel / door sill trim, which is actually all one piece. Remove the little plastic nut shown below next to the dead pedal. Just unscrew it by hand. When the time comes to put it back on, you can just press it on without turning it. Clever.
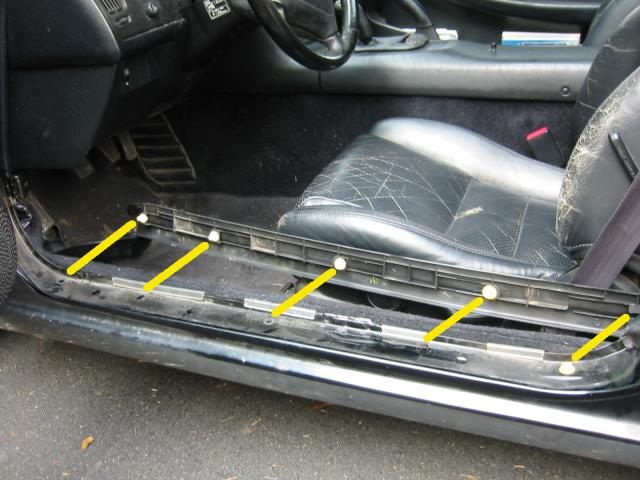
Step 2: Pull the trim piece free from around the front trunk latch. Once it's free of the latch, work your way back along the door sill pulling up on the trim piece. It's attached to the door sill by five of those plastic tree things. You can do this part by hand, or you can use the flathead screwdriver to help pry the trim up as you go. It's a good idea to cover the tip of the flathead with some electrical tape to avoid scratching anything. Refer to the pic below to see the location of the plastic trees. The yellow lines connect the trees to their corresponding holes. Some may pull out of the trim piece and stay in the holes on the door sill. They can be removed with pliers.
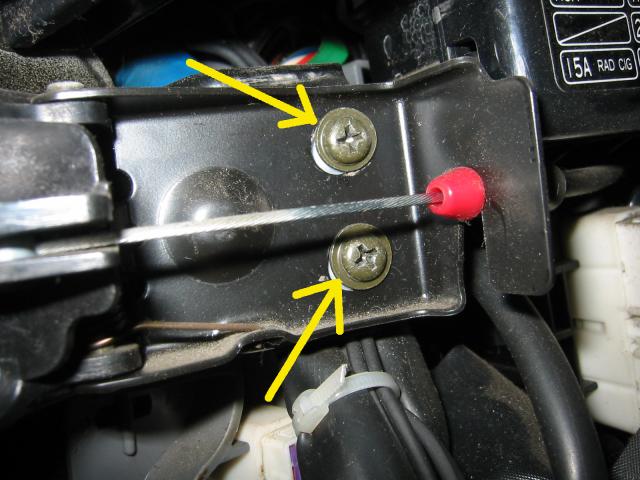
Step 3: Now we need to remove the latch that opens the front trunk (frunk). Pull back on the latch to get access to the two phillips head screws. Remove these screws, taking care not to drop these screws down behind the carpet. Now we can slide the frunk latch out of the way.
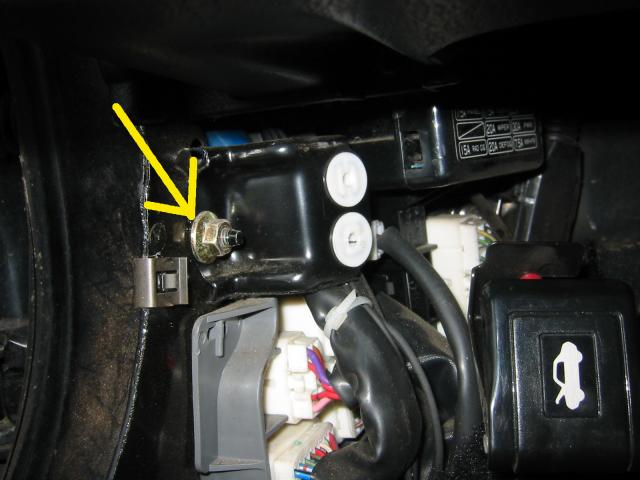
Step 4: The last step in this phase is to remove the mounting plate the frunk latch attaches to. It's held on by a single 10mm brass nut. Remove this nut and slide the plate off.
This section covers the removal of the door panel. There's an excellent write up of this process at http://www.turbomr2.com , be sure to check it out before beginning. I include my own simplified guide here for completeness and because, well, I already took all the pictures before I found the above link. Oh well.
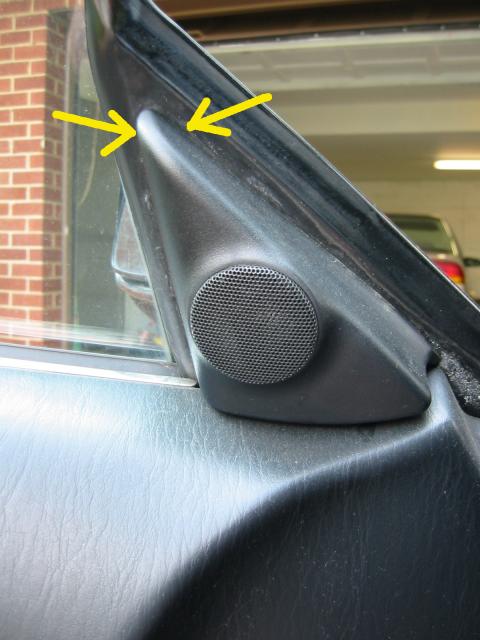
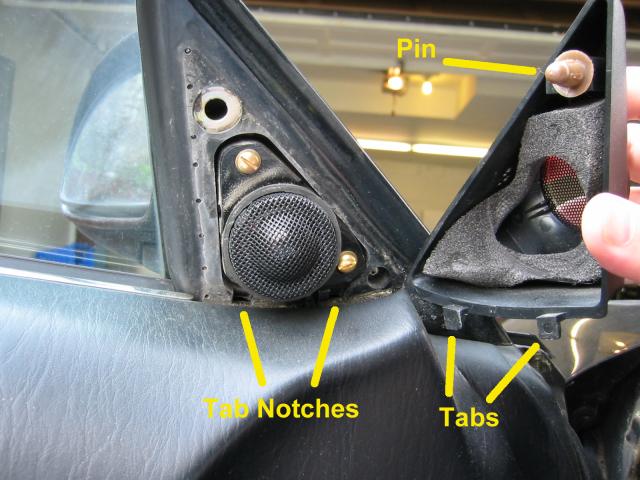
Step 5: First we need to remove the tweeter cover, also referred to as the sail panel. This trim piece is held in by a press fit pin and two tabs. To remove it, grab the top point of the tweeter cover shown by the arrows below and pull back. Once the pin is out, pull up slightly to clear the tabs. This should be easy. The second pic below show where the pins and tabs are. The pin is a hard black plastic post with a ball on the end. It inserts into a soft brown plastic sleeve that may come out with the pin.
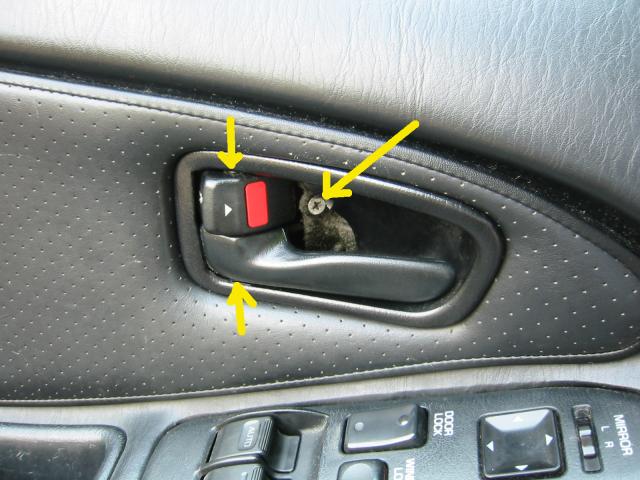
Step 6: Now we need to remove the various door trim bits, like the switch panel, door latch trim, and door pull trim. We'll start with the door latch trim. Remove the small phillips head screw shown below. You can then pry out the trim piece from the rear, using the tape-covered flat head. Note there are two protruding pins for the handle and door lock you need to clear. As you work the trim out, you'll probably need to push up on the top and push down on the bottom part of the trim piece to get past the pins. The pin locations are shown with arrows, you can just make out the top pin in the pic below. Go slowly, this trim piece has been known to crack. Mine was already cracked when I started this procedure and once I removed the screw the free piece fell off. I didn't bother trying to fix it since it's not that noticeable.
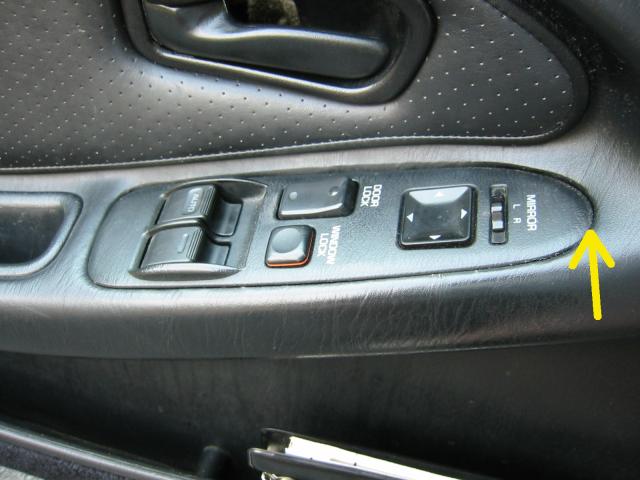
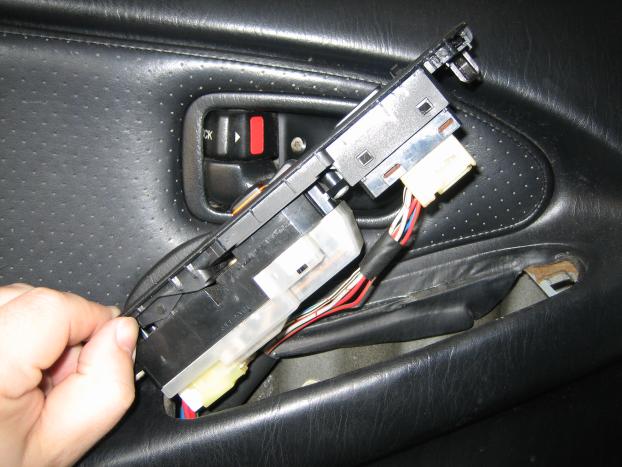
Step 7: Next remove the switch panel. This panel is held in by a press pin at the front end and a tab at the rear. Begin prying the panel up with the covered screwdriver at the point shown below. Once the front is free, you should be able to tilt the front up to clear the rear tab and remove the switch panel. There are two electrical connectors you'll need to disconnect as well.
Step 8: Now remove the door pull trim. This is held in by two press pins at the bottom. Just pry around the edge with the flathead and pull up on the pull handle, and it should pop out.

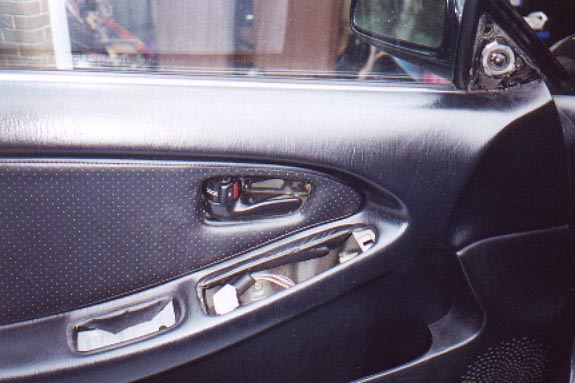
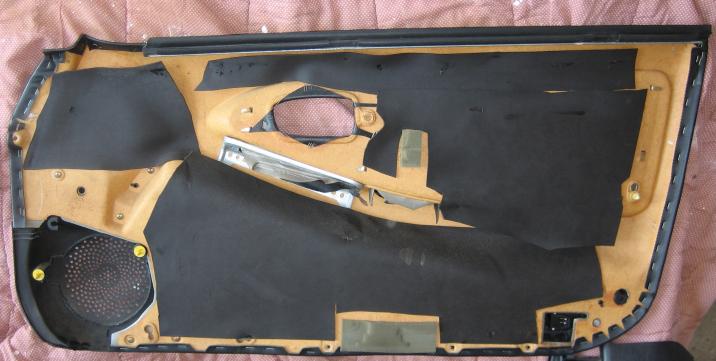
Your door should now look like the pic below; holes where the door pull trim and switch panel were, exposed tweeter, and exposed door latch. Now we're ready to start pulling of the door panel itself.
Step 9: Remove the phillips head screw on the leading edge of the door panel shown below. The head of this screw is normally covered with a small plastic button. Pry off the button with the covered flathead and remove this screw.

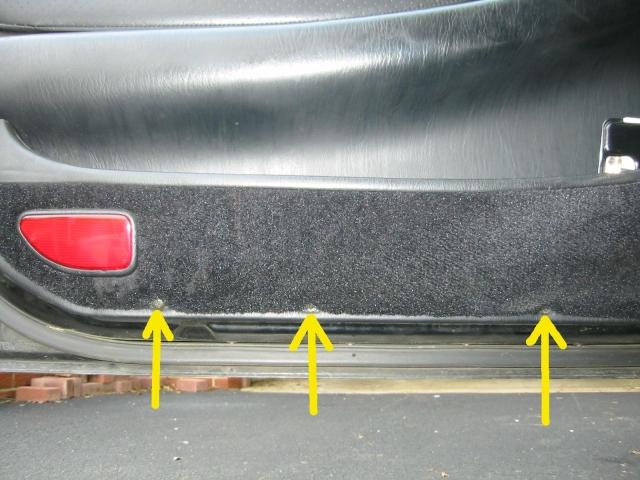
Step 10:Remove the three phillips head screws on the bottom edge of the door panel shown by the arrows below.
Step 10: Now we're ready to take off the door panel. The panel is secured to the door by numerous plastic "tree" clips, the same ones we removed when we detached the door sill trim in Step 2. I'd recommend starting at the bottom rear of the door and working your way around. Just pull the door panel towards you and you'll be able to feel where the plastic fasteners are. You can use the covered screwdriver if you want, but be very careful with it when you're near the speaker. Take your time.
Once the panel is free of all the plastic clips, lift up on the panel. It should come free from the top of the door and fall back towards you. There's one more step before the door panel is completely free, and that's to disconnect the wire for the courtesy light at the rear of the door. This is another standard Toyota connector. There's not a lot of slack in the wire, so I found the best way to avoid pulling on it is as follows: Sit down in front of the door. Lift the panel up just enough to free it from the top of the door, then let the bottom of the panel rest on your knees and tilt the panel back towards your chest. With the panel in this position you can reach down and disconnect the courtesy light without ever putting tension the wire. The clip in question is circled below.
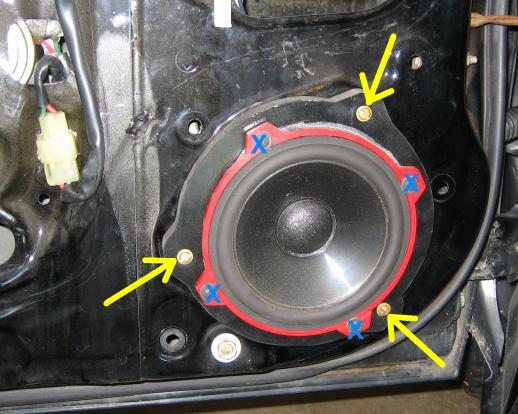
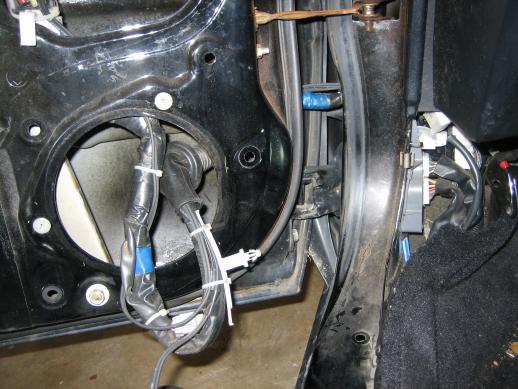
Step 11: Remove the speaker by unscrewing the three screws on the speaker mounting plate shown by the yellow arrows below. Note the speaker itself is attached to the plate with four screws (blue X's). Don't remove these, just the mounting plate screws.

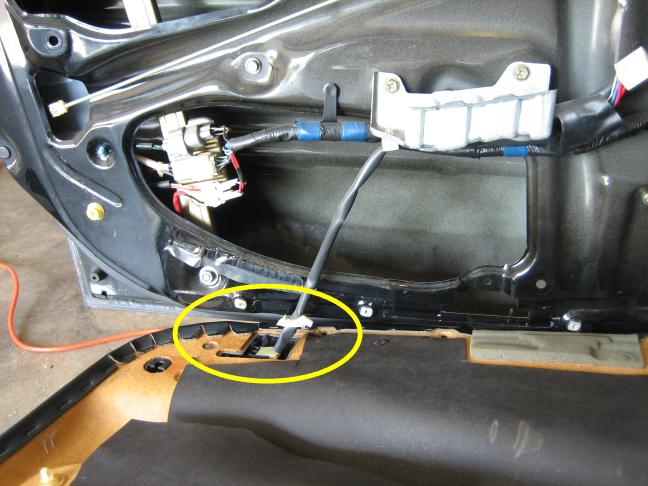
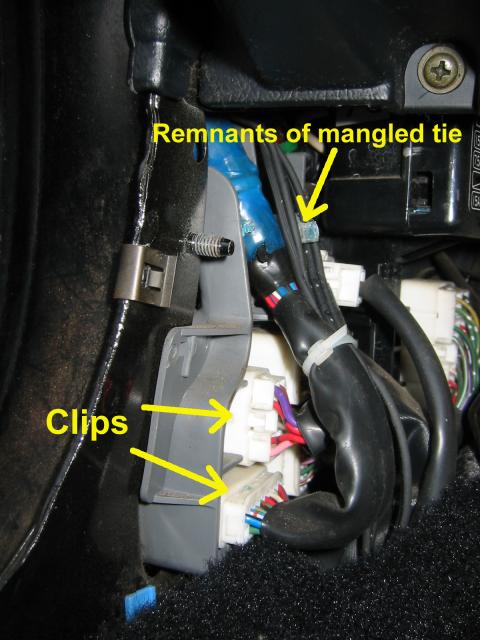
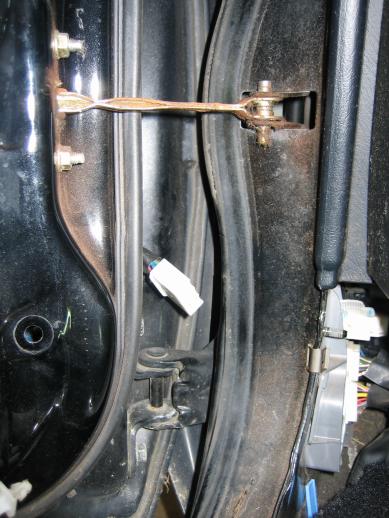
Step 12: Next we need to free the harness, starting at the kick panel side. Disconnect the two clips shown below. They're immediately beneath the panel where the frunk latch attached. A small flathead screwdriver can help depress the tab clips to disconnect them. An inch or two above the plugs along the harness is a plastic band that secures the harness to the side of the foot well. It looks like an extra wide zip-tie. I didn't see an obvious, reversible way to remove this, so I just cut it with diagonal pliers. It's not really needed. In the pic below you may also notice two thicker black wires zip-tied to the rubber boot on the harness. These are part of my audio install.
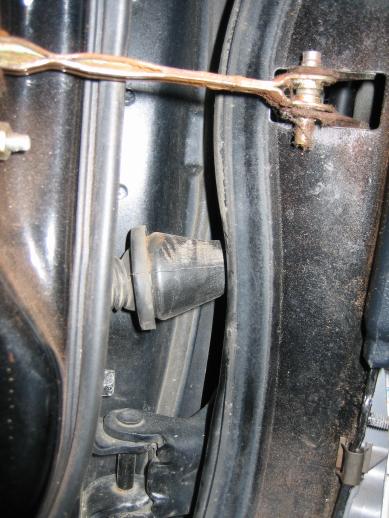
Step 13: There's another clip on the door side of the lower door hinge that we need to remove. Just press the wings together with your hand or with needle nose plies and push in towards the door. It may help if you reach into the speaker hole with your other hand and pull on the harness where the clip is at the same time.
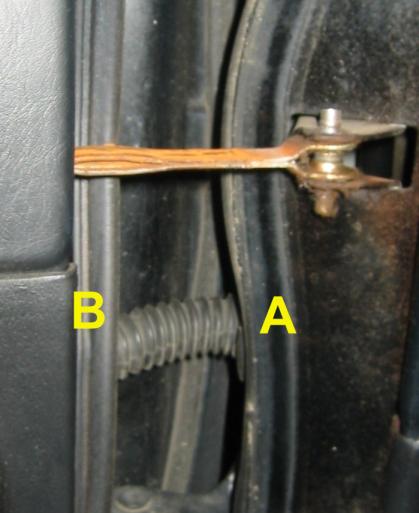
Step 14: Now for the hardest part of the job, manipulating the wiring harness out through the speaker hole. This was a pain. Go slow, and whenever possible, PUSH on the wiring harness, DON'T PULL. You want to avoid placing tension on the already weakened wires if you can. The accordion rubber boot around the harness is press fit into the door and kick panel at the two points A and B shown below. These points are my references for describing the order in which I removed the harness.
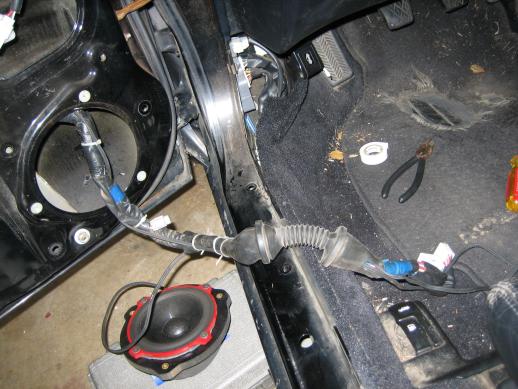
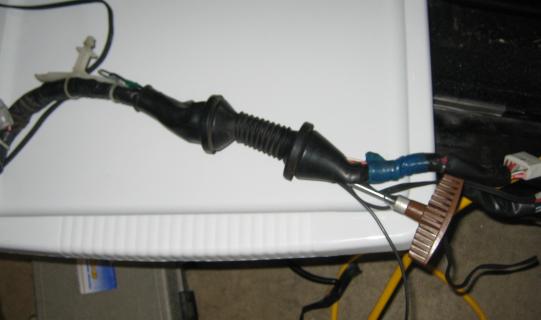
Step 15: At this point your door should look like the pic below: The free end of the wiring harness is sticking out through the speaker hole and you have enough slack to work on it. I used the white top to a plastic storage bin as a makeshift work surface.
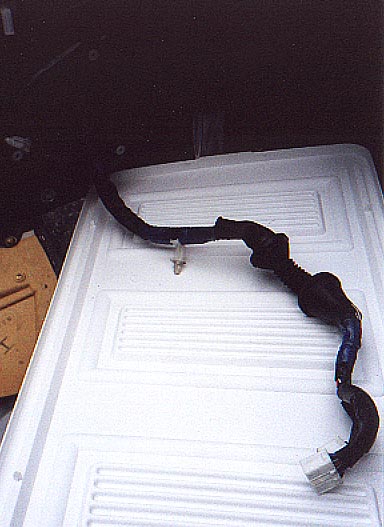
Step 16: Now we want to slide back the rubber accordion from the wires themselves to see where the trouble is. Again, you want to avoid excessive tension on the rubber boot if possible. I found it easiest to slide the boot towards the clip end. Grab the clip side of the boot in one hand and the door side in the other, and bring you hands together. Think of it as compressing the boot away from the wires rather than pulling the wires away from the boot. I can't really think of a good way to describe this, but it should make sense when you have the harness in front of you. Once the boot is slid back, it should look like the pic below, and hopefully your problem wires will be as obvious as mine were. You may also take this opportunity to ponder how the #%&@ so much water got into the harness in the first place.
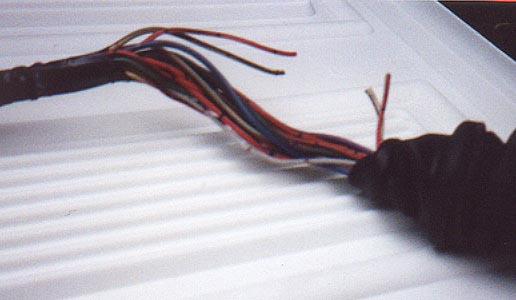
Step 17: I had obvious breaks in two of my wires, the main ground wire (white with black stripe and red dots) and a smaller orange/red wire. The open ends of the wire showed obvious signs of corrosion. If your wire troubles aren't as obvious as mine, now's the time to break out the voltmeter with continuity check and go hunting. The ground wire is a common failure point, beyond that check any wire related to whatever stopped working to cause you to take this all apart in the first place (window, locks, etc.). The wiring diagrams in the BGB will be invaluable here.
Once you've identified all the bad wires, it's time to repair them. I DO NOT recommend making the repair inside the accordion region of the harness. Any connection, whether solder or splice, will reduce the flexibility of the wire in a region that needs to be flexible. I tried soldering in a short splice the first time; a few years later I found myself back inside the door, repairing the same wire. A much better approach is to splice in a much longer wire, making the connections in non-flexing, weather-protected areas of the car.
First I pushed the new ground wire through the accordion using the tool shown below. It's a gun cleaning rod with a small patch loop on the end. Very handy.

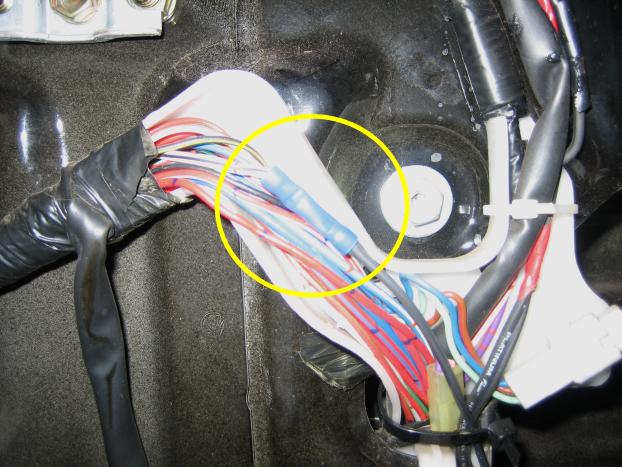
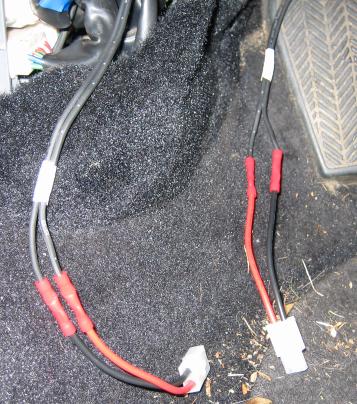
I used butt splice connectors on both ends with good solid crimps. I used 16 gauge wire for the splice, I wouldn't go any smaller. I spliced one end in near the white plastic routing clip:
Step 18: (optional) If you're thinking about an audio install anytime in the near future, now's a good time to run some speaker wire to the doors. I ran two sets of wires (one for tweeter, one for woofer) through the accordion harness. The gun cleaning rod mentioned above works well here, but if you don't have one, try using the tool shown below. It's Toyota SST # 00002-04200-01, also known as a piece of wire coat hanger with a loop bent in the end. I secured the wires to the outside of the harness in several places with zip ties.

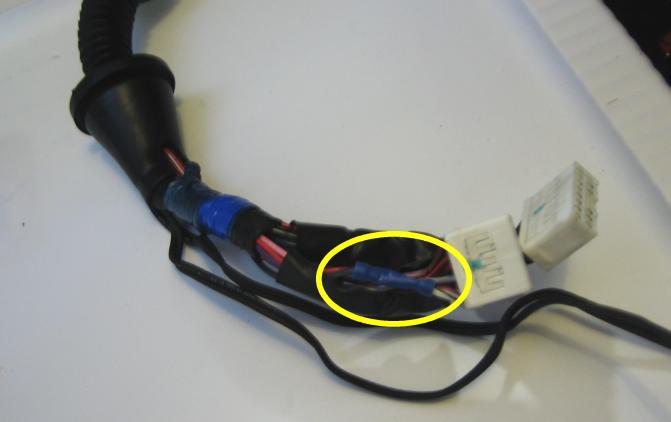
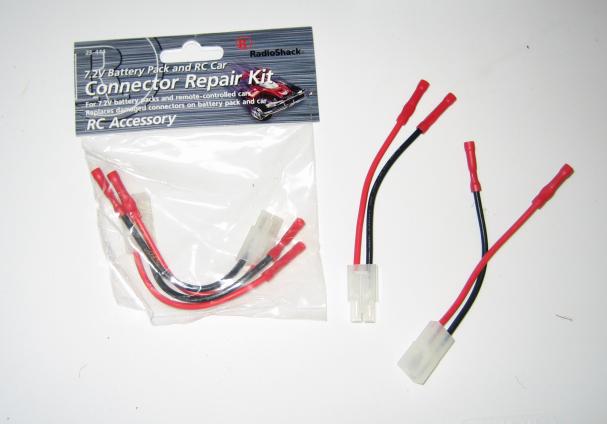
It's also a good idea to make some provisions for disconnecting the speaker wire near the kick panel, in case you need to remove the harness again. I spliced in a pair of disconnects, as shown below. These are crimp-on 2-wire connectors with a latch. You can get them in various gauges, use wire no thinner than your speaker wire. They're sold at Radio Shack, among other places, and these particular connectors were marketed as a battery repair kit for RC cars.
Step 19: Once the repair is done, pull the accordion boot back to its original position on the harness. Now it's time to put everything back together.
Step 20: Put the harness back into the door, push it the clip ends back through the door gap and back down into the driver's foot well. Make sure the press fit grommet-like parts of the accordion boot are seated in their respective holes. Also be sure to remember to re-attach the clip by the door hinge. This clip keeps the harness in place and prevents it from interfering with the window.
Step 21: Put the door back together. Be sure to tighten the speaker plate screws well. Also, when snapping the door panel back in, be careful not to puncture the speaker cone with any of the nearby plastic tree fasteners. Give the panel a good rap with the heel of your hand to make sure all clips are fully seated. This will prevent annoying rattles.
Step 22: Put the door sill / kick panel trim back together and reattach the frunk latch. Congrats! You should now have a working window/lock/mirror. Put all the tools away and go for a spin.
 Up to the top